Using Azure to provide a holding page for a site that's not available

Parts in this series:
One of the fantastic things about Azure is how quickly you can spin up, and down, services as and when you need them. In a world where not everything's been migrated to the cloud yet this can be very useful when you need to provide a temporary replacement for something that's currently self-hosted.
Imagine this scenario; you host your corporate website on servers that are inside your building (I know, I know!) and there's a planned power-down of the entire building for several hours. Given enough time and resource this would be impetus to migrate the website to the cloud, one way or another. Back in the real world of short notice and many projects vying for your time a stopgap solution that allows you to retain an online presence for those few hours is something is something that appeals. ENTER STAGE LEFT: Azure.
Using Azure to host a web application is nothing new, or particularly interesting, but mixing in a dash of Table Storage means that rather than just having a simple/static holding page that lets your customers know what's going on, it's possible to keep capturing contact details to try and minimise the number of lost opportunities.
Connecting a Web App to Azure (Table) Storage
The first (and least interesting) thing to do is to create the web app that's going to be sitting in Azure. I'm going to do this via the dotnet command for brevity (all commands carried out in your directory of choice):
D:\Git>MD HoldingPage
D:\Git>CD HoldingPage

D:\Git\HoldingPage>dotnet new sln

D:\Git\HoldingPage>MD HoldingPage.Web
D:\Git\HoldingPage>CD HoldingPage.Web

D:\Git\HoldingPage\HoldingPage.Web>dotnet new mvc

D:\Git\HoldingPage\HoldingPage.Web>cd..

D:\Git\HoldingPage>dotnet sln add .\HoldingPage.Web
With that out of the way the next thing to do is open the solution in Visual Studio 2017 (I'm using version 15.9.0) and start hooking it up to Azure. I'm going to show how to do this using the baked-in tooling in Visual Studio because it really does make it phenomenally easy.
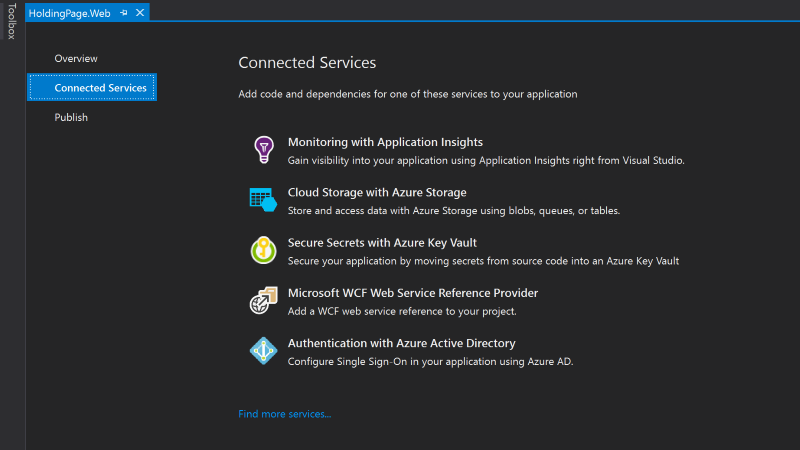
With the solution loaded in Visual Studio there's a Connected Services option in Solution Explorer immediately under the HoldingPage.Web project node. If this isn't present you may need to ensure you've got the appropriate Visual Studio components installed, which I suspect is Azure development:

To hook up Azure, double click on the Connected Services node in Solution Explorer and a new tab will open with options to connect to various diffferent Azure services:
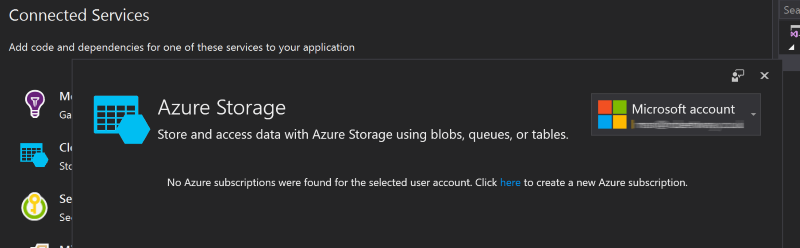
From here we want to choose Cloud Storage with Azure Storage by clicking once on its title which brings up a window to either select a subscription associated with a user account of create a new one. If the user you're logged into Visual Studio with doesn't have any associated Azure subscriptions (or the user Visual Studio has defaulted to if you have multiple associated with your Visual Studio installation) you'll see this:
Either choose a different user that does have an associated subscription or create a subscription and Visual Studio will list all your existing storage accounts along with giving you the option to create a new one:
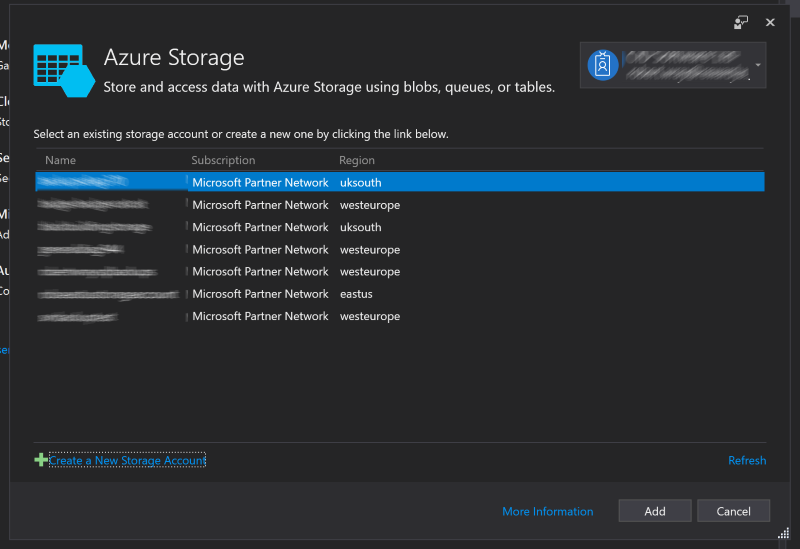
For now, I'm going to choose one of my existing storage accounts and click the Add button at the bottom of the window. This will trigger Visual Studio to start installing required NuGet packages and to otherwise configure your project to talk to the Azure Storage account selected:
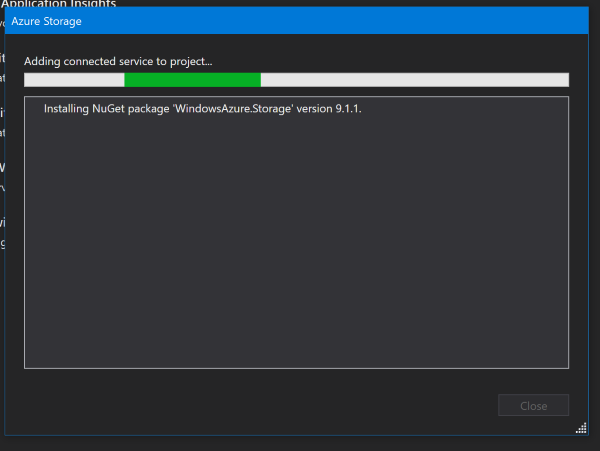
Now that's done, looking inside the Dependencies > NuGet node of Solution Explorer will show that the WindowsAzure.Storage package has been added to the project - this is pretty light dependency wise but it's worth noting that it does pull in Newtonsoft.Json so if you're adding this to an existing project that has a dependency on a specific version of this ubiquitous package, be aware.
Looking inside appSettings.json also shows a change that's been made here, which is a new entry under the ConnectionStrings node. In my project this was given the rather dull name of AzureStorageConnectionString-1, change this to something more specific if you want! This connection string consists of three of four different pieces, semi-colon delimited, as key value pairs. The two that are ones that you may need to tweak at some point in the future are the values for AccountName and AccountKey. If you ever need to change the AccountKey (essentially an access password) this is where you'd do it once you've updated it in the Azure portal. Each Azure Storage Account has two (why?) so this can be done with no down-time.
Writing to Azure Table Storage
Now that the project has all the required bits to talk to Azure Table Storage, the last thing to do is put some code in that actually writes data to it. This is almost the easy bit. There are two things that you need, first a POCO that describes the structure of the data you want to write to the table in Azure and second, code that actually writes this data to Azure.
As I'm writing this to provide a holding page where customers can leave their details, the POCO reflects that:
using System;
using Microsoft.WindowsAzure.Storage.Table;

public class ContactEntity : TableEntity
{
    public ContactEntity()
    {
        PartitionKey = DateTime.Now.Date.DayOfYear.ToString();
        RowKey = $"{Guid.NewGuid().ToString()}";
    }

    public string Email { get; set; }
    public string PhoneNumber { get; set; }
    public string Name { get; set; }
    public string ReasonForContact { get; set; }
    public DateTime ContactDate { get; set; }

}
There are two things to note here, firstly that in order to use the POCO as an entity for Azure Table storage it needs to inherit from TableEntity and secondly that the base properties PartitionKey and RowKey need to be set. As this project was for small-scale data capture and didn't need to be perfect (or even close!) I paid no heed to making sure that they were good, rather I ensured that they were unique enough. There's a fantastic amount of detail in Design scalable and performant tables if you want to / need to dig into the details.
The ContactDate field isn't strictly necessary as records that are added to table storage come with a Timestamp value (and assoicated property inherited from TableEntity) which may well suit your purpose.
With the POCO created, the mechanics of displaying a contact form and passing the data to a controller action are left to you. I opted to post the data via AJAX and dynamically update the content of the page to remove a page refresh/transition and give a slightly smoother user experience but however you do it, the net result is the same: An action on a controller receives some data that needs to be written to an Azure Storage table.
The final piece is writing the received data to Azure Storage which consists of (in an async action):
var storageAccount = CloudStorageAccount.Parse(AzureStorageConnectionString);

var tableClient = storageAccount.CreateCloudTableClient();

var table = tableClient.GetTableReference("Contacts");

var contact = new ContactEntity()
{
    ContactDate = DateTime.Now,
    Email = emailAddress,
    PhoneNumber = phoneNumber,
    ReasonForContact = reasonForContact,
    Name = contactName
};

var insertOperation = TableOperation.Insert(contact);

var result = await table.ExecuteAsync(insertOperation);
Aside: If you don't populate the RowId and PartitionKey you'll receive an exception on the call to table.ExecuteAsync of 'StorageException: BadRequest'. If you click on Show raw exception details you'll see various bits of information one of which will be, in this example, 'ErrorMessage:The values are not specified for all properties in the entity.'
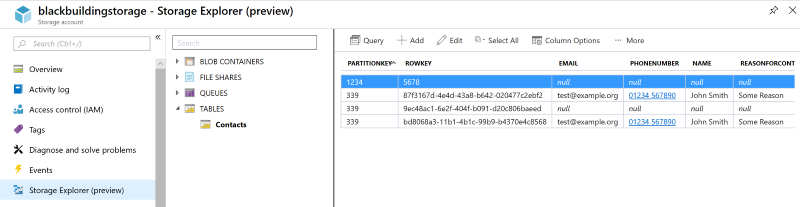
A visit to the Azure Portal to use the integrated Storage Explorer, which is currently in preview, (or the standalone version if you like) shows the data that's been written to the table:
All that's left to do is (a) find somewhere to host the app, and (b) redirect traffic to the app. I'm going to write this up at a later date.