Using Azure App Services to host a holding page for a site that's not available

Parts in this series:
In the first post of this series I put together a .NET Core application that uses Azure Storage (in table form) to keep records of "call me back" requests from customers, so that when the main site isn't available traffic is redirected and there's always something available for customers rather than them receiving a generic browser error.
The specific scenario I put this together for was:
- Company hosts its corporate website and other web services (e.g. Online Bookings, Email Preferences, etc,..) in their own building
- There's a planned power-down of the building coming
- There are reasons (good, bad, technical or otherwise) why all the services can't be readily moved off-site or into the cloud
In these circumstances, once the planned power-down happens anyone visiting any of their sites will receive something that looks a little like this:
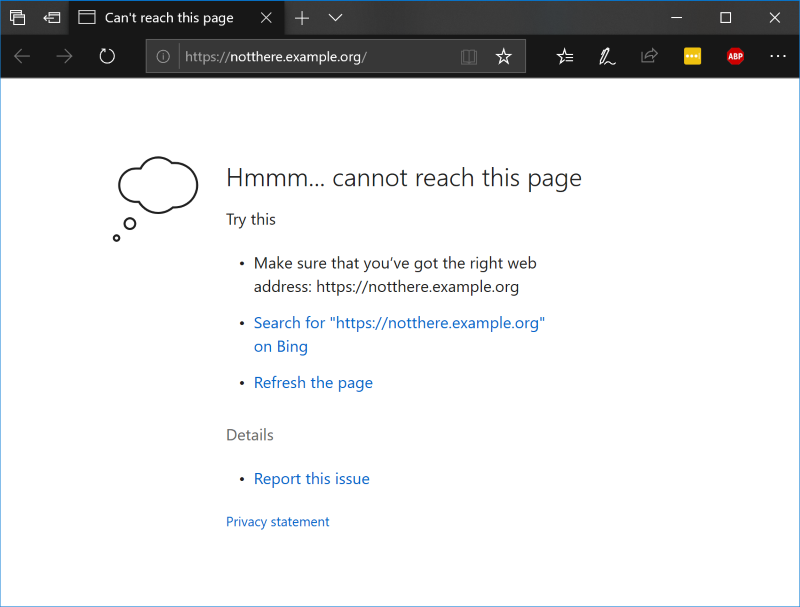
That's far from ideal as far as customer experience is concerned, and even worse for potential customers as they may well go to a competitor and not look back!
So, what can be done do to fix this? The answer: Host a holding page elsewhere and cut-over to it when our site is unavailable so that customers can at least see we still exist and leave us a message so we can get back to them.
Hosting the Holding Page with Azure App Services
Hosting the app in Azure App Services is the easy bit, setting it up right to minimise downtime is a little bit harder but I'm going to break out all the steps here to do so. If you don't already have an Azure subscription to use, Microsoft are very generous with offering 12 months of free services that are more than ample to try this out giving more than enough credit to run this solution for quite a while.
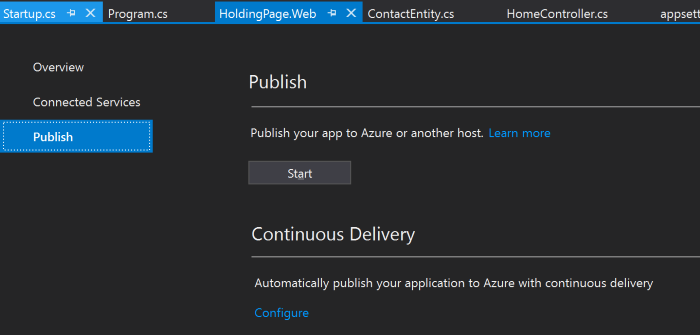
First up is publishing your application to Azure App Service and the easiest way to do that is via the the Publish option in Visual Studio. It's not the most rigourous and well defined of deployment processes but for a proof-of-concept like this, it's just about right. Taking the holding page app that I've previously put together, right-clicking on the project in Solution Explorer and selecting Publish brings up this screen:
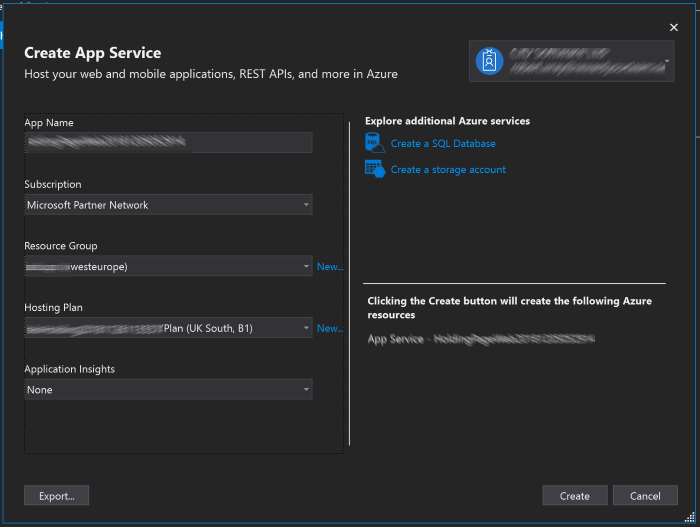
Clicking the Start button brings up a window where you can choose where to publish to, be it an App Service, Linux App Service, Azure VM, IIS or a folder. I'm going to leave the choice of App Service selected and also leave the default of Create New selected before clicking the Publish button at the bottom of the window. That, after a few seconds while Visual Studio thinks about what it's goikng to do, brings us to the Create App Service window which will spend a few more seconds loading your list of Azure subscriptions before looking like this:
Note: There can be quite a pause between clicking on Publish and this window being shown, do wait patiently otherwise Visual Studio will load multiple copies of the window.
This gets pre-filled with a truly awful default App Name (do change this - it'll be part of the URL of your site, though this doesn't really matter as that will get hidden later on), a choice of your subscriptions and other defaults for the Resource Group and Hosting Plan that the App Service is going to live in. I'm going to use the New... link next to Resource Group and App Service to create new ones for the purposes of this post but you could re-use existing ones if you wanted to.
I've opted to call the resource group holding-page-test and do the same with the Hosting Plan, just to keep things consistent. Whilst the names that Visual Studio suggests for resources are unique, they're far from memorable and once you've got quite a bit of stuff sat in Azure it becomes a bit of identifiers with strings of numbers on the end.
When creating the Hosting Plan, I'm opting for B1 to ensure that apps in the plan have access to all the bits and pieces I need, specifically SSL and Custom Domains (a detailed comparison of the features available in each level of Hosting Plan can be found here). Do remember that the Basic tier can have unlimited Apps hosted in it and you pay per plan so don't create one plan per App unless you have good reason to!
So, the settings I've picked for the Hosting Plan look like this:

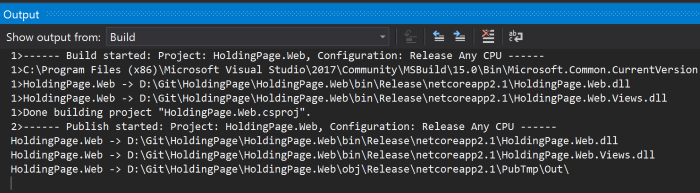
With those settings set and saved, clicking Create back in the main Create App Service window will result in a spinner appearing at the bottom left whilst Visual Studio creates your Azure resources and publishes your site to Azure. Once Visual Studio has finished creating Azure resources, the window wiill close and the Output window will pop-out from wherever you normally have it docked to show you the progress of packaging and publishing your App:
When that's finished, Visual Studio will open the App in your default browser and you'll be able to see that its default URL is https://[my_app_name].azurewebsites.net/ which is one of the reasons to pick a half way decent name for your App!
Now that the app is published and working, the next thing to do is set it up so that its ready to go to take over from the site(s) that won't be available.
Configuring the holding page web app to respond to custom domains
When you're creating a Web App in Azure to serve people when your website isn't available, having it hosted at something.azurewebsites.net isn't very useful, which is where the ability to configure custom domains comes in.
Setting up custom domains is done through the Azure Portal (https://portal.azure.com/). Once you've logged in, with the same credentials that you used in Visual Studio to create and publish the app, the quickest way to get to your app is to type its name into the search box at the very top of the page and the Azure portal will filter all the resources you've created to show you ones that match:
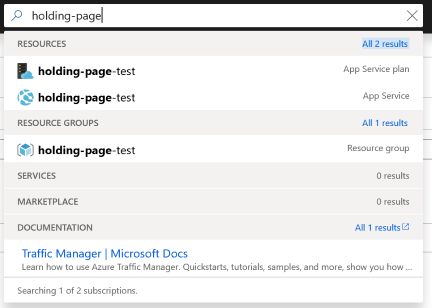
This is where naming things relating to a given project shows its worth as the App Service, App Service Plan and the Resource Group I placed them in are all shown in the search results so clicking through to any of them is quick. I'm going to go straight to the App Service.
Now that I'm in the configuration page for the App Service, it's time to start setting up some custom domains. A newly created App Service will have one domain associated with it, which is a sub-domain of azurewebsites.net. Adding custom domains is done by clicking on, well, Custom domains in the left-hand bar (it's under the section heading Settings at the time of writing). Without any custom domains configured, this page looks rather sparse:
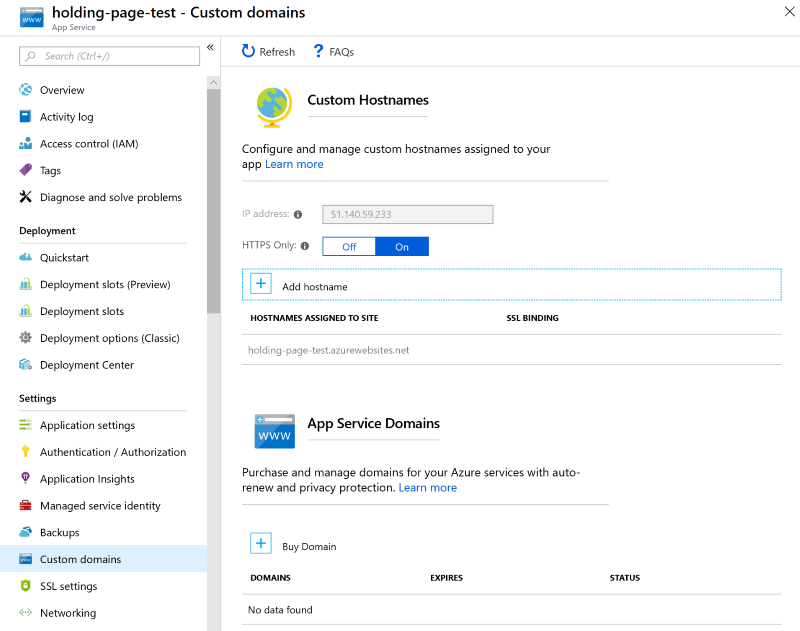
Clicking on the + next to Add Hostname will cause a fly-out to appear on the right-hand side of the screen where you can enter a hostname and click Validate to add it. Don't do that yet.
In order for Azure to accept a custom domain, one of two things must be true. Either the domain name must be in DNS as a CNAME that points to the [my_app_name].azurewebsites.net domain, or there must be a TXT record against your domain that lets Azure know it's authorised to serve content for that DNS name. If this was for a brand new domain/sub-domain then creating/setting the CNAME record would be the easiest option but as this is going to be a holding page for existing domains changing DNS so that Azure will allow us to add the custom domain names isn't ideal.
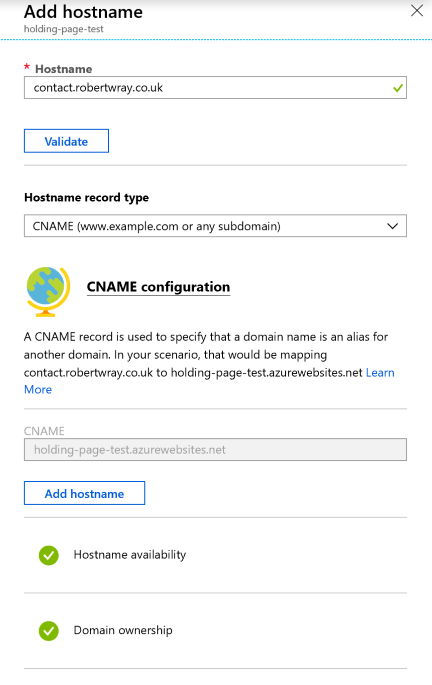
If the domain we're going to provide the holding page for was contact.robertwray.co.uk, by creating a TXT record with a name of awverify.contact and a value of [my_app_name].azurewebsites.net Azure can trundle off and check DNS to confirm that it's authorised to serve content for that DNS name without having to interrupt service to that site (more details at docs.microsoft.com). Here's the DNS entry, as setup in Cloudflare, for this example:

Once that DNS entry has been added, go back to the Azure portal, enter the domain name and click the Verify button. After a few seconds whilst Azure goes off and checks DNS to confirm that either the CNAME or TXT record exists the bottom half of the fly-out will populate, hopefully showing two green ticks for Hostname availability and Domain ownership along with an Add hostname button. Click that button!
Once the button's been clicked you should see the domain listed under Hostnames assigned to site which means that the App Service is good to go. If your site is served over SSL, click on SSL Settings immediately under Custom domains and upload your certificate, if not, make sure you turn off HTTPS Only on the Custom Domains page.
With that all done, the App Service is now setup to respond to requests to, in my case contact.robertwray.co.uk, which means that updating DNS to point to it instead of the server that's going to be unavailable is now viable. The downside to this is that it's a manual process, but in the next post I'll cover how to use Azure to automate this.