Creating an Azure function that triggers when a blob is uploaded - Publishing to Azure from Visual Studio 2017
Parts to this series:
- Creating an Azure function that triggers when a blob is uploaded
- Creating an Azure function that triggers when a blob is uploaded - Creating and running in Visual Studio 2017
- Creating an Azure function that triggers when a blob is uploaded - Sending an email via Office 365
- Creating an Azure function that triggers when a blob is uploaded - Publishing to Azure from Visual Studio 2017 (this one)
Compared to the rest of it, this is actually the easy bit. I've already got an Azure Function App created, the imaginatively named robsfunctions, which is where I'll be publishing the function I've created to. If you haven't created a function app via the portal, it's easy enough to do so, or you could follow the work-flow for publishing to a new function app as it's probably not that different.
Publishing the Function to Azure
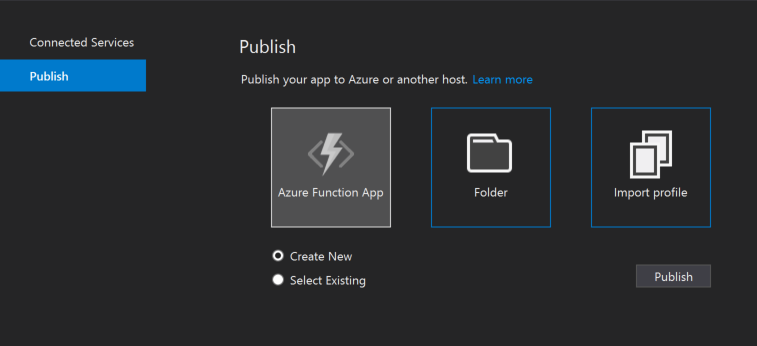
To start the process of publishing to Azure, right-click on your project in Solution Explorer and choose "Publish...". If you've never published the project before, you'll be presented with a screen where you can choose whether to publish to an Azure Function App, a folder or to import a publish profile from elsehwhere to use. The option I'm working with is Azure Function App. Once that's selected there are two radio buttons to choose from, "Create New" and "Select Existing". As I've already got an Azure Function App to publish into, I'll choose "Select Existing" and then click on Publish.
Assuming that you've logged into the account you use for Azure with Visual Studio, the next window that appears will either have that account selected (if you're lucky), or you'll need to select it in the drop-down at the top-right, answering any credential prompts that are requried. There is "Add an account..." at the bottom of the drop-down at the top-right, but it takes a couple of glances to spot it.
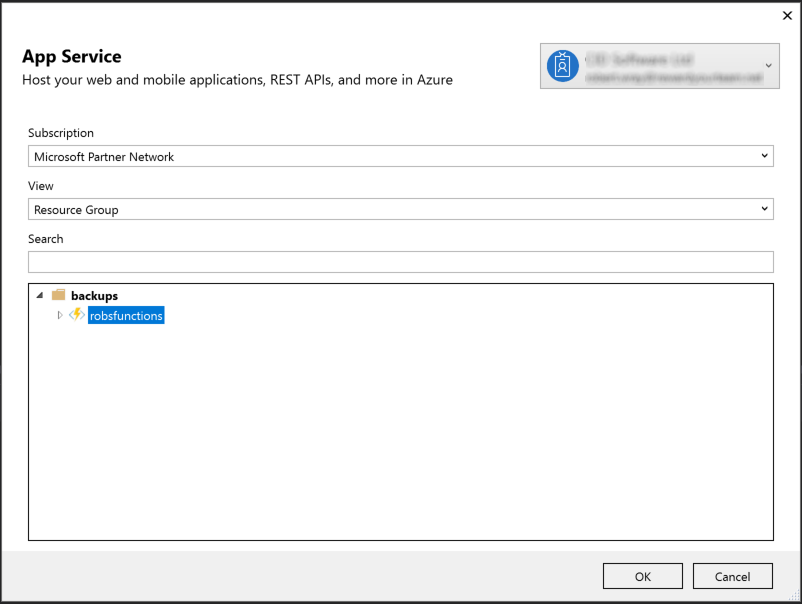
Select the Function App to deploy into and click on "OK". Visual Studio will spin its wheels for a few seconds before presenting you with some slightly misleading UI, in the form of a screen with a disabled "Publish" button.
Now, the reason that this is misleading is because, it's disabled for a very good reason, that reason being that Visual Studio is actually in the middle of publishing your function(s) to Azure. The first time I use this, I was sat patiently waiting for the Publish button to enable (for whatever reason, that time it took something like 90 seconds to publish), eventually assuming that I'd encountered one of the seemingly inexplicable "things that are broken just for me, just at the moment" that Visual Studio throws at people from time to time. One look at the Output window will show the reality though:
Restoring NuGet packages...
To prevent NuGet from restoring packages during build, open the Visual Studio Options dialog, click on the Package Manager node and uncheck 'Allow NuGet to download missing packages during build.'
1>------ Build started: Project: OnBlobStorageUploaded, Configuration: Release Any CPU ------
1>OnBlobStorageUploaded -> C:\Users\robertwray\Documents\Visual Studio 2017\Projects\OnBlobStorageUploaded\OnBlobStorageUploaded\bin\Release\net461\bin\OnBlobStorageUploaded.dll
========== Build: 1 succeeded, 0 failed, 0 up-to-date, 0 skipped ==========
  Publish Started
  OnBlobStorageUploaded -> C:\Users\robertwray\Documents\Visual Studio 2017\Projects\OnBlobStorageUploaded\OnBlobStorageUploaded\bin\Release\net461\bin\OnBlobStorageUploaded.dll
  OnBlobStorageUploaded -> C:\Users\robertwray\Documents\Visual Studio 2017\Projects\OnBlobStorageUploaded\OnBlobStorageUploaded\obj\Release\net461\PubTmp\Out\
  Updating file (robsfunctions\functionsSdk.out).
  Updating file (robsfunctions\SendEmailViaOffice365\function.json).
  Publish Succeeded.
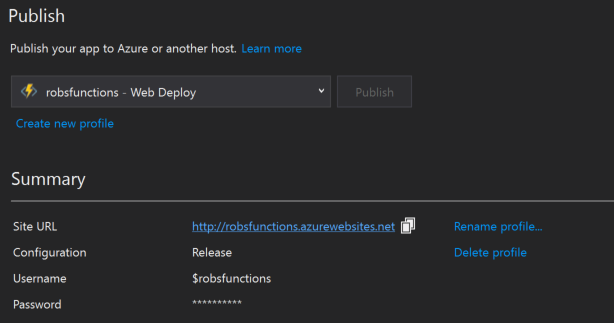
And the "Publish" button has enabled. A trip to the Azure portal, and it can be seen that the function app has published correctly and is now present.
All that leaves to do to get this working is to add the settings required (that are being retrieved via ConfigurationManager) to Azure so that the Function can run, then checking to make sure it does actually run correctly.
Adding the required settings to the Function App in Azure
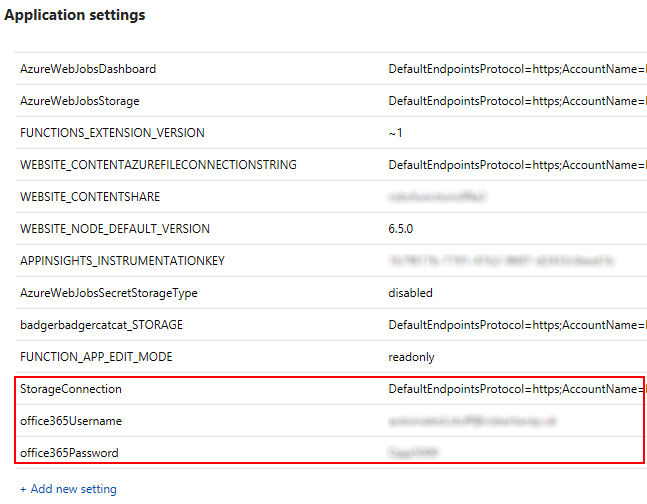
In order for the function to run, it needs three settings:
- StorageConnection - the connection that should be used for the blob storage we're monitoring
- office365Username - the username that we'll use to connect to Office 365
- office365Password - the password that we'll use to connect to Office 365
The place I've chosen to store these (I'm sure there are probably other places / ways to do this, but this worked for me) is inside the "Application settings" for my Function App. To get to these, I started off at the Azure Portal, clicked on "All resources", then found my Function App and clicked on that, being careful to not mistakenly click on the Application Insights that I'd created for it!
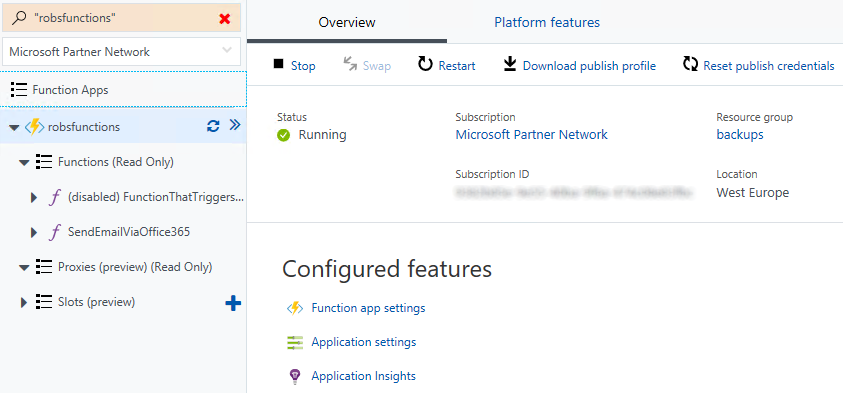
From here, click on Application settings under the Configured features heading to bring up the settings page. There are four main headings on this page, General settings, Debugging, Application settings and Connection strings, we're going to be adding values to the Application settings group. To do this, click on the + Add new setting button at the bottom of the grid, which will pop up two text fields to add the name of the setting and the value for the setting in.

Work through each of the setttings that needs to be added, writing in its name and value then clicking + Add new setting again to add another row. Once all three have been added, scroll back up to the top of the page and click the Save button/link.

You'll see an "Updating web app settings" spinner appear for a while and the editable fields for all your Application settings will disable themselves, if it takes longer than a few seconds it'll dismiss itself to the notification icon at the top right of the Azure portal.

Once the save has completed, the editable fields will re-enable and you'll get a notification that (hopefully!) your web app settings have been successfully updated, they should then look a little bit like this:
If the storage account you chose (the one that you've entered into the "StorageConnection" setting) to work with already has some items that match the path pattern used (i.e. is something in the container samples-workitems) you should start receiving email notifications for each of the blobs in a minute or so - because of the amount of time Office 365 autodiscover takes, it's not a particularly quick process. If not, upload something to the container, sit back and wait for an email to arrive!
Because we left the call to the logger in the code, we can watch the "Logs" for the file to go in, so, click on your function in the left-hand side tree (i.e. expand out the name of your Function App, then the Functions node, then click on the name of the function that's been created, which I called SendEmailViaOffice365) then click on the "Logs" right at the bottom of the page to expand them. Once this is open, you can see entries for processed blogs going in real-time, for example:
2017-09-20T06:45:07  Welcome, you are now connected to log-streaming service.
2017-09-20T06:46:07  No new trace in the past 1 min(s).
2017-09-20T06:46:15.271 Function started (Id=657d6769-d1eb-49ae-90ed-bd4245f2d08c)
2017-09-20T06:46:15.271 C# Blob trigger function Processed blob
 Name:azure_portal_view_function_app_save_appsettings_added.PNG
 Size: 35152 Bytes
2017-09-20T06:46:27.623 Function completed (Success, Id=657d6769-d1eb-49ae-90ed-bd4245f2d08c, Duration=12358ms)
Notice how it took 12,358ms - most of that time is the Office 365 Autodiscover gubbins happening! Another way to view this (that will show you historical details as well) is to click on Monitor underneath the name of your function.
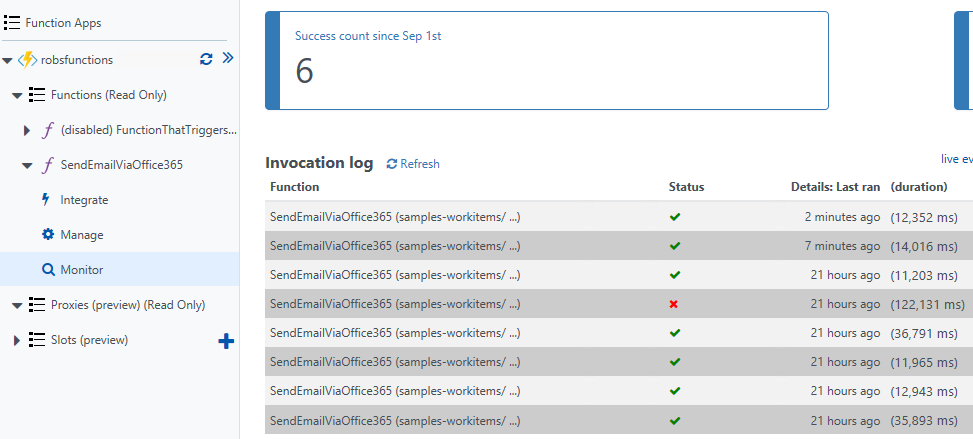
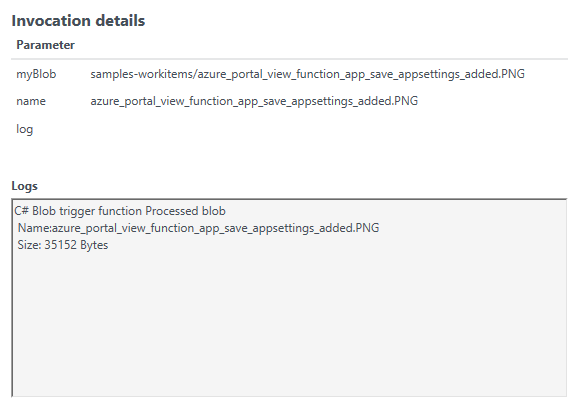
This shows you each of the requests that have been processed by your function, when they ran, how long they took to run and by clicking on the line for that invocation, the Invocation details and Logs panes to the right will be populated with the parameters that were passed in for the request and the output that's come back out (which should hopefully be the same as you saw in the Logs view).
So that's everything done, from beginning to end, creating a function in Azure itself, creating it in Visual Studio, sending an email via Office 365, publishing the function into Azure, configuring the function and watching it in action.