Taking the GUID out of ASP.NET Core Identity
I've been working on an ASP.NET Core web project using the built-in ASP.NET Core Identity solution. All the project scaffolding was done by choosing to create a new ASP.NET Core Web Application, choosing the 'Web Application (Model-View-Controller)' option and configuring the application to use 'Individual User Accounts'. After that Visual Studio did the heavy lifting of creating the project and populating it from the template (for a .NET Core project, does it actually shell out to the dotnet command, or programatically invoke that which the command does?).
Related posts:
- Taking the GUID out of ASP.NET Core Identity (this post)
- Splitting out ASP.NET Core Identity into a separate library
- Extending the ASP.NET Core Identity user
- Reading and writing custom ASP.NET Core Identity user properties
- Extending the ASP.NET Core Identity UserManager to set the Employee Id during registration
- The finishing touches to hooking into ASP.NET Core Identity user creation
Changing to an integer for Ids
However, the unique identifiers that are generated for users are GUIDs, stored in strings. Bleurgh. Changing this so that integers are used is reasonably simple and starts with the addition of two custom classes, a custom IdentityUser and a custom IdentityRole (so that IdentityRole's are identified by integers as well):
public class ApplicationIdentityUser : IdentityUser<int>
{
}

public class ApplicationRole : IdentityRole<int>
{
}
Once these classes have been created the next thing to do is to update the bits and pieces of the auto-generated code so that they're aware of these types of IdentityUser and IdentityRole. Starting with the ApplicationDbContext which is found in \Data\ApplicationDbContext.cs, update this so the class definition looks like this:
public class ApplicationDbContext : IdentityDbContext<ApplicationIdentityUser, ApplicationRole, int>
The three generic type parameters that are being specified are TUser, TRole and TKey. The first two should be fairly self-explanatory but the last is slightly less obvious; it's the "The type of the primary key for users and roles", so needs to match the type that we've specified in our ApplicationIdentityUser and ApplicationRole classes.
The next place that needs to be updated is in \Startup.cs where Identity is wired in to look like this:
services.AddDefaultIdentity<ApplicationIdentityUser>()
    .AddEntityFrameworkStores<ApplicationDbContext>();
Now that's done the last thing to do is to re-create the data migrations (so that the database will be created with the correct structure) before running the app up to create the database. The easiest way I've found to do this is to delete all the files in the \Data\Migrations folder and then from the command line (in the web application projects directory) run the following command:
dotnet ef migrations add IdentityModel -o Data\Migrations
That command instructs dotnet to add a new migration called IdentityModel and to place it in the Data\Migrations directory.
[Added 10/2019]: You need to update the view /Views/Shared/_LoginPartial.cshtml to change the two lines beginning with @inject to be:
@inject SignInManager<ApplicationIdentityUser> SignInManager
@inject UserManager<ApplicationIdentityUser> UserManager
This replaces IdentityUser with ApplicationIdentityUser as otherwise you'll see "InvalidOperationException: No service for type 'Microsoft.AspNetCore.Identity.UserManager`1[Microsoft.AspNetCore.Identity.IdentityUser]' has been registered." when you first try to run the web app.
Before I spin-up the web application to create the database, I make one more small tweak - this time in appsettings.json. This is to change the connection string to point to a "real" instance of SQL Server rather than the LocalDB instance that's pointed to by default, solely because at this stage it makes it easier to poke around inside the database and have a look.
Running it up and creating the database
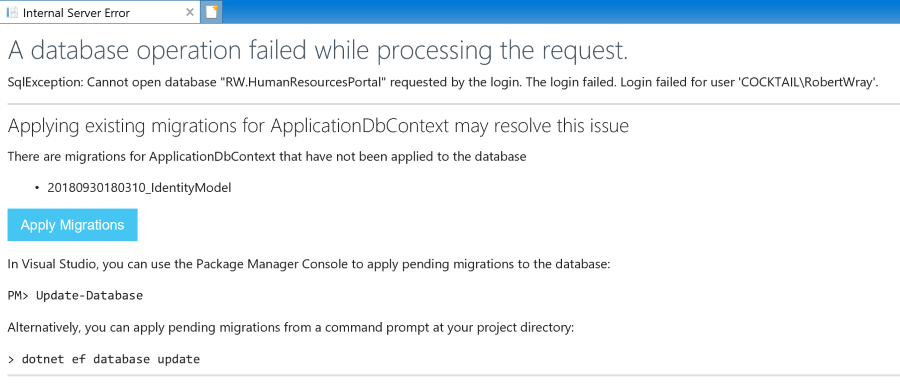
You can run the command dotnet ef database update to create the database, or run the web application and let it take care of it for you. Running the application, following the Register link and filling in details of a new account will trigger this page to be shown:
Clicking the Apply Migrations button will trigger the creation of the database and tables for each of the ASP.NET Identity objects. After a short while, the Apply Migrations button will change to look like this:
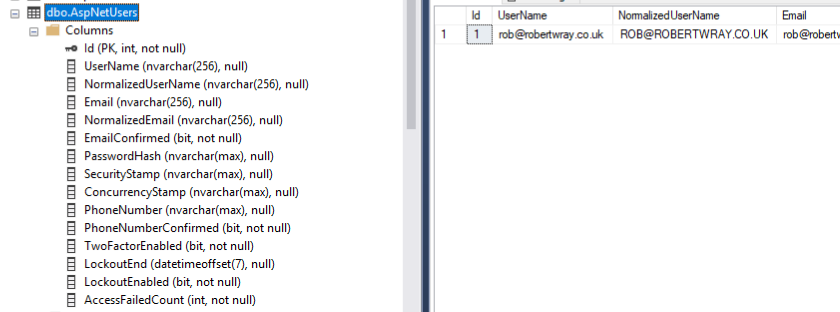
Hit F5 and you should be redirected to the homepage, with your user logged in! A quick look in SQL Server Management Studio shows that the user table has been populated with the details used to register and that the Id column for the AspNetUsers table has been created as an integer column:
That's pretty much all there is to it, but it is worth bearing in mind that by changing to an auto-incrementing integer id you've made user id's much more guessable. Be careful to ensure that you secure any methods that take a User Id to ensure that someone can't, for example, call a URL suibstituting a low id number (e.g. 1) and perform an action on your Administrator user - like changing the email address associated with it!


