Running Pi-hole on a CentOS virtual machine

Pi-hole is an awesome piece of software intended to be run on a Raspberry Pi (the clue's in the name!) that will sit quietly on your network responding to DNS requests, dropping ones for spammy domains into a blackhole. This can result in a quite substantial reduction in network traffic, lower CPU use by your browser and a generally snappier and more responsive internet. Just because it's called Pi-hole and intended to be installed on a Raspberry Pi, it doesn't mean that you can't install and use Pi-hole elsewhere!
Because I didn't have a Raspberry Pi to hand with Raspbian on, I opted to use a Virtual Machine instead. If you want to give it a go, here's the pretty simple and quick steps to setup Pi-hole on a CentOS virtual machine running under Hyper-V.
Creating the Virtual Machine
This is the easy bit, the steps are for a Windows Server 2012 R2 server but should be essentially the same all the way up to Windows Server 2019 as the relevant screens look the same on the current Windows 10 insider preview.
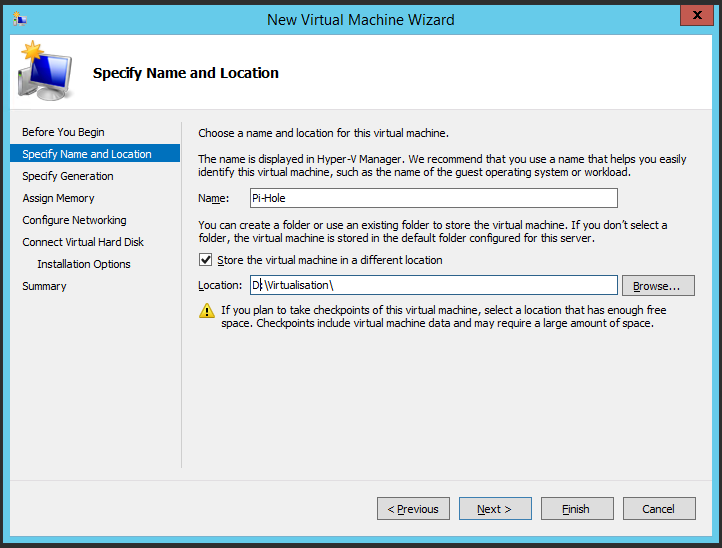
Create the Virtual Machine by opening Hyper-V Manager, choosing 'New' from the Actions pane on the right-hand side and selecting 'Virtual Machine...'. If the wizard show the 'Before You Begin' page, move straight to the next page to name the VM and override where the VMs files will be stored, if necessary.
The next page allows you to select the generation of Virtual Machine being installed. I generally work on the basis of choosing the newest/latest when I'm doing something for learning purposes, so I'm going to choose Generation 2. Because this uses/offers Secure Boot it's quite likely that CentOS won't install, I need to remember to come back and turn this off later.
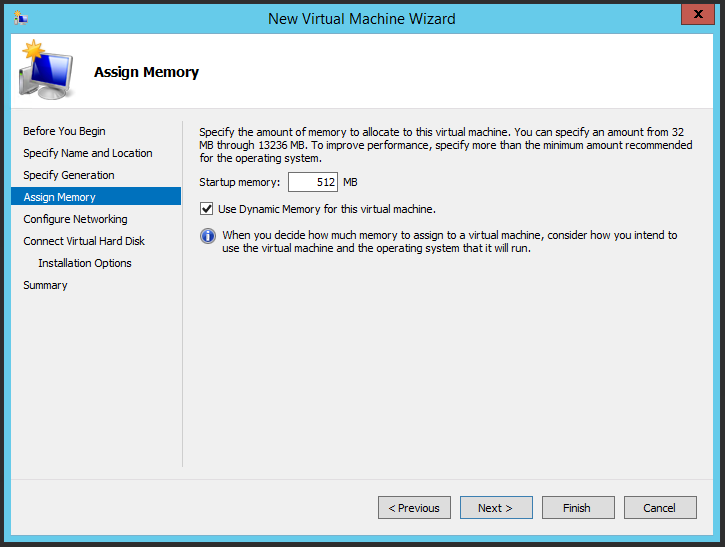
Next up is the page where memory can be configured, which I'm going to leave as the default 512MB of RAM as the system requirements for Pi-hole suggest that's ample. I am going to switch on Dynamic Memory though:
With that done the next step of the wizard congfigures networking. As this is a device which provides network infrastructure services, it definitely needs access to the internet so be sure to choose an appropriate adapter before continuing.
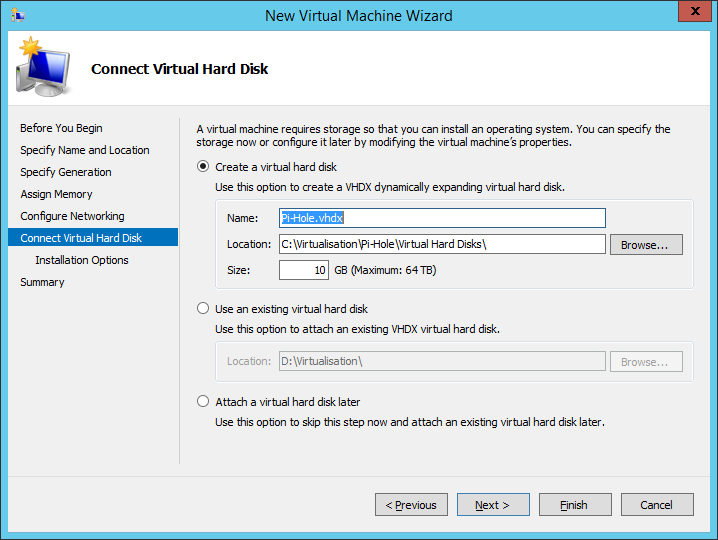
Next up is configuring the Virtual Hard Disk, where I'm going to go in kinda tight. A Pi-hole on my network that's been running for nearly a day has an on-disk VHDX size of 1.7GB, the CentOS ISO is 4.27GB and the Pi-hole system requirements suggest a disk requirement of 52MB, so 10GB as a disk size seems more than ample:
After that I'm going to skip through the optional Installation Options and attach the CentOS ISO once I've downloaded it.
Retrieving the ISO for CentOS 7 is a simple matter of browsing to https://www.centos.org/, clicking on the orange 'Get CentOS Now' link in the middle of the page, choosing 'DVD ISO' and then selecting from one of the mirrors. Make sure to save the ISO to somewhere accessible, I picked my C:\Virtualisation\ folder as that's where the rest of the ISOs for the VMs on this host live.
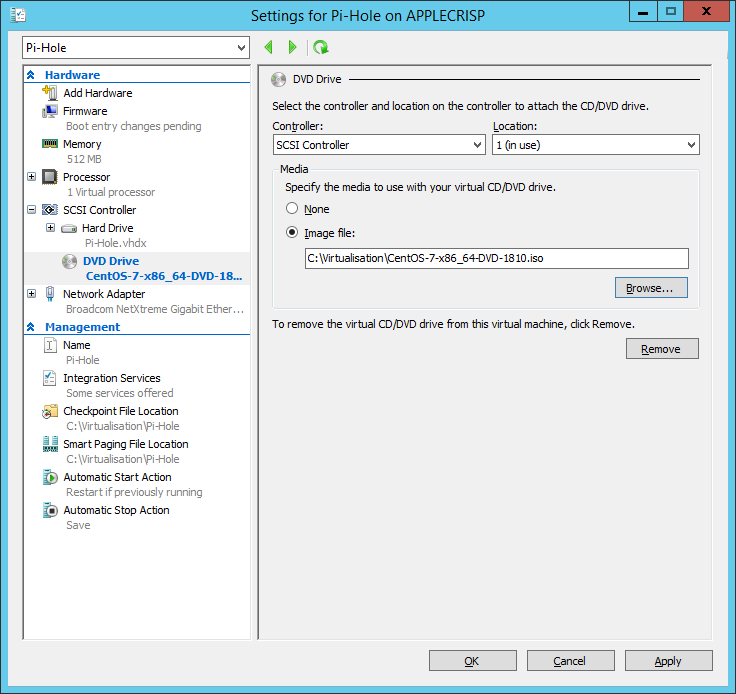
Right-click on the VM, choose Settings and add a DVD drive that's got the ISO attached:
With that done, it's time to start the VM!
Installing CentOS 7
With the virtual machine created and the CentOS ISO downloaded and mounted, next up is starting it up and installing CentOS, so after starting the VM up pops this:
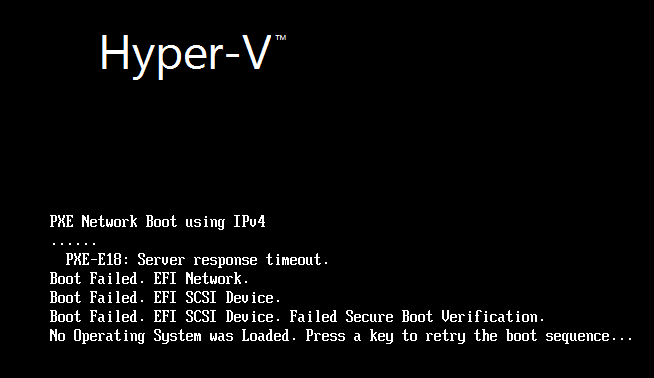
Remember how I mentioned needing to disable Secure Boot earlier? That's what you'll see if you don't. Shutdown the VM, change the configuration to disable Secure Boot (which is found under the 'Firmware' settings area) and start it up again.
After the PXE Network Boot finally times out (changing the boot order to prefer the Hard drive over the DVD/Network is probably a good idea once the machine's built, to ensure it comes up quickly), the boot options for CentOS will be displayed. Pick 'Install CentOS 7' from the available options and wait for the CentOS installer to start. Once it hits the 'WELCOME TO CENTOS 7' screen, chose your language / locale of choice and click 'Continue'. The 'Installation Summary' screen will appear with some items, like Installation Source and Software Selection marked with an exclamation mark:
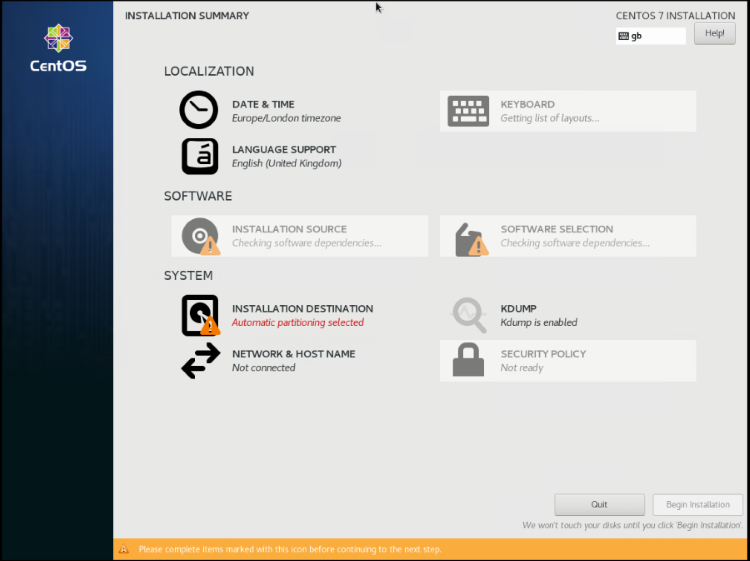
Leave the installer for a few minutes so that it can finish checking software dependencies, leaving just the Installation Destination to be confirmed. Click on the icon to display the details of the automatic partitioning, then click on the 'Done' button at the top-left of the screen to accept the defaults. Once the settings are saved, the exclamation mark will disappear and the 'Begin Installation' button will become enabled. Click it to start CentOS installing.
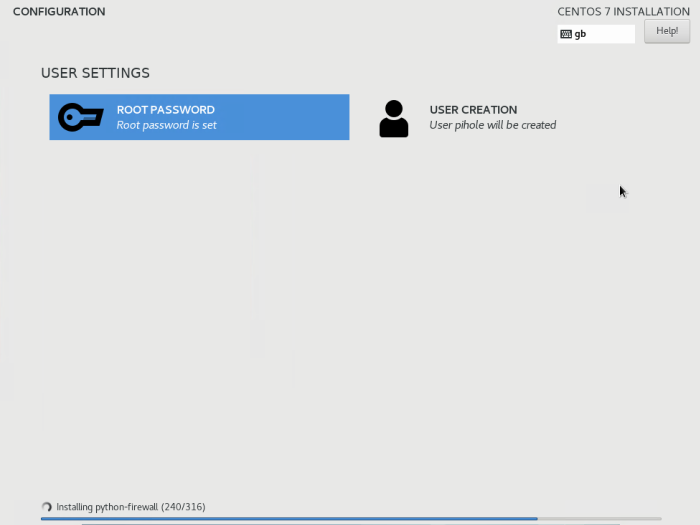
Installation will now start and you'll be prompted to set the root password and create a user, whilst CentOS is installing in the background. Make sure you do both! Oncer you've set both, the screen will look like this for a little while:
Eventually installation will finish and you'll be left with a blue Reboot button at the bottom right of the screen, click that to restart the VM into the installed instance of CentOS.
Installing Pi-hole
At the login prompt, login using the user that you created during setup:

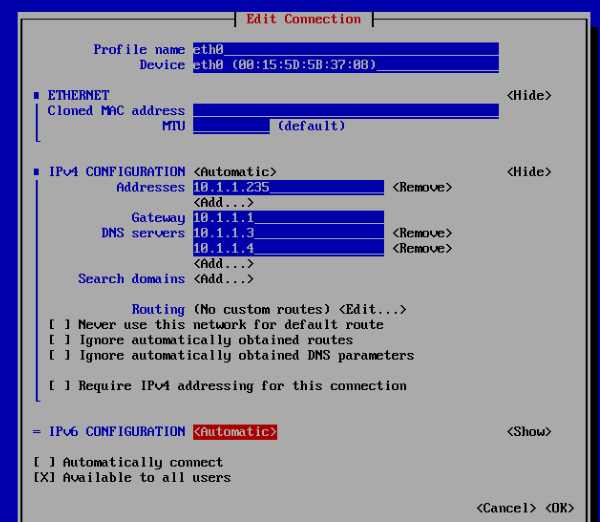
Next up is configuring the VM to have network access so that it can download Pi-hole and then use it to service requests from the local network, which is done using the nmtui command, which I'm going to run via su so that it has the requisite access to load/save network configuration.
The three options available once ntmui is loaded are Edit a connection, Activate a connection and Set system hostname. I'm going to start by using the arrow keys to go to Set system hostname and enter a hostname of pihole.cocktail.local before tabbing to the OK button, hitting it and acknowledging the confirmation dialog that appears. Once that's done, choose Activate a connection, select eth0 from the list, then tabbing across to the Activate button and pressing enter to trigger it. A dialog should appear for a second or so that says 'Connecting...' before the button text changes to Deactivate and an asterisk appears next to eth0 in the list. Now's the time to hit escape to return to the menu and select Edit a connection to set a static IP address for the machine:
With that done, I've exited to the command line and run the reboot command to restart the machine. I don't know if it's necessary with CentOS after configuring the network, I suspect it probably isn't, but it almost certainly can't hurt.
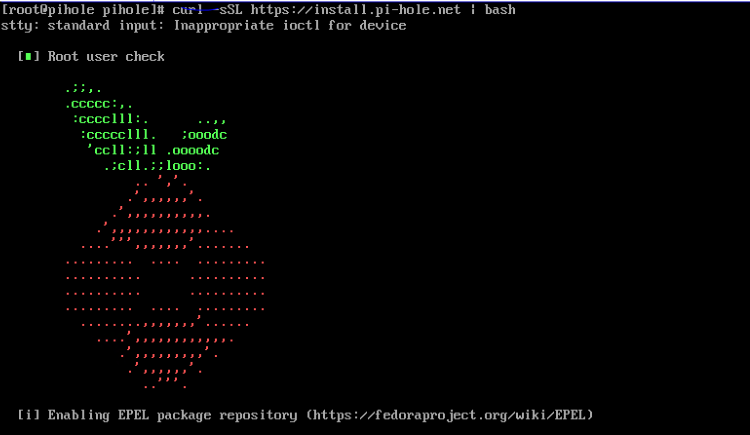
Now - to install PiHole! The one-step automated install is achieved by running this command (again via su):
curl -sSL https://install.pi-hole.net | bash
Pretty swiftly this will cause a splashscreen to appear whilst the installation script preps stuff:
After a short while, you'll be prompted to decide whether to install PHP 7.x, I opted to say yes to this. This will trigger the installation of PHP7 which takes a good few minutes to complete.
Once the installation of PHP7 has been completed, up will pop a warning that SELinux is being enforced on the system, which apparently Pi-hole doesn't like. Make a note of this to come back to later and click on the Yes button to carry on, then click through the next two windows - there's only an Ok button so there's nothing else that you can do anyway. This should bring us to the Static IP Needed window, again with only an Ok button. Click through this and choose your upstream DNS provider. I'm going to choose Custom as I have a local domain that needs to be hooked in, but Cloudflare is a pretty good bet for general use. Because I've chosen custom, Pi-hole will prompt for the IP addresses of DNS servers, which I'll specify and then click Next to store and then Yes on the "are you sure" window.
Now for the interesting bit, the choice of third party lists to use for ad blocking:
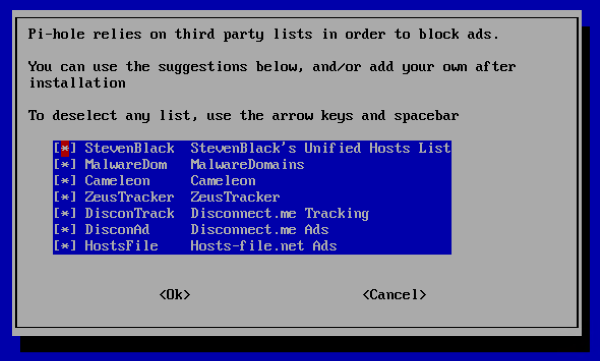
I'm going to go for the simple option, leave everything chcked and click Ok to move installation forwards to choosing which protocols (IPv4 and IPv6) to provide ad blocking for. I'm again going to leave the default selected and click Ok to move forwards. Now work through each of the IP address settings pages, adjusting anything if necessary until you get to the question Do you wish to install the web admin interface? Definitely leave this one at the recommended default of On and click Ok to move to the next question, which is another to leave at the default of On. Now for the last few questions, like whether you want queries logged (up to you - I left this set to On which is the default) and the level of privacy to afford to users. Once that last question has been answered, the process of installing Pi-hole commences.
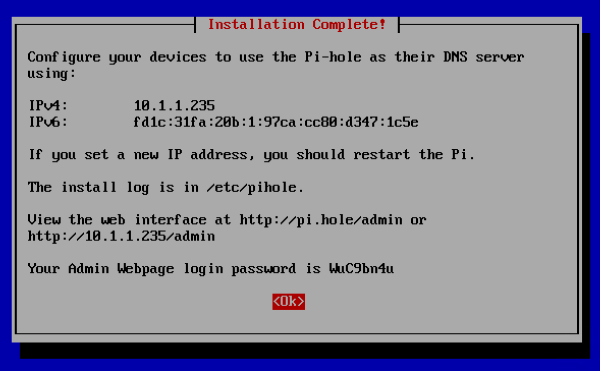
Once the installation is complete, on a default CentOS install the Pi-hole installer will spot that there's a firewall running and offer to setup the rules that are required for Pi-hole to work - choose Yes to this. That's the last step and after a minute or so Pi-hole will report that it's installed and running, along with telling you what the password for the admin UI is:
That's all the hard work done! Well, nearly! The last thing to do is disable SELinux by following the instructions here and rebooting. Until you do, any attempt to browse to the admin console will just return a 400 Bad Request message.
Once that's done, loading the admin console works and the last bit of work to do is configuring devices to use the CentOS virtual machine as their DNS provider, most likely by updating the settings in your router. I'm not going to go into any detail lookng at what's inside the admin console for Pi-hole, it's mostly self-explanatory and the key outcome here is having Pi-hole running and filtering DNS requests for junk domains.