Getting Opserver (the awesome monitoring solution from Stack Exchange) to monitor DMZ servers
I've written about how awesome Opserver is before, but one thing I hadn't had time or opportunity for was getting the dashboard (which operates via WMI) working for servers that are sat in our DMZ. These servers are (a) not domain joined, and (b) heavily isolated with a strict set of ports open between the DMZ network and the business network. These steps are based on the target servers running Windows Server 2012 (I know, I know!) and there may be additional steps that are necessary, or steps that are redundant, on other versions.
Step 1 - Change the WMI service to run as a standalone host
In order to make life simple for the Firewall, changing the way the Windows Management Instrumentation service is configured so it runs as a standalone host is the first step. This means that rather than it using dynamic ports, which mean that you'd need to open a whole range in your firewall, it uses just port 24158 as well as port 135. The steps to do this were extracted from this serverfault answer:
- Remote desktop to the server you want to monitor
- Open an administrative command prompt
- Run the command winmgmt -standalonehost
- Use the Services control panel to stop and then start the Windows Management Instrumentation service
Don't forget to add a rule to your firewall to allow the server running Opserver to talk to the target server(s) on port 135 and 24158!
Step 2 - Create a local user that mirrors the domain user
In my environment, Opserver is running as a domain account which has access to the domain joined servers that it's monitoring. As Opserver doesn't (currently, although there are a couple of issues in its GitHub repository where mention is made of changing this in the future) have the facility to vary the credentials used for WMI calls by target machine a local user on the server being queried with the same name and password as the domain user is required. This user also needs to be a member of specific groups:
- Create a new user with a name and password that mirrors those of the domain user (make sure to not have 'User must change password at next logon' ticked)
- Add the user to the Administrators, Performance Monitor Users and Performance Log Users groups
- Open Component Services by running Start > Run > DCOMCNFG
- Expand Component Servies > Computers, right-click on My Computer and choose Properties from the context menu
- Go to the COM Security tab and click on Edit Limits... under Acces Permissions
- Add the newly created user and make sure they've got Allow selected for both Local Access and Remote Access
Step 3 - Disable UAC filtering for local accounts when connecting remotely
According to User Account Control and WMI on docs.microsoft.com:
In a workgroup, the account connecting to the remote computer is a local user on that computer. Even if the account is in the Administrators group, UAC filtering means that a script runs as a standard user. A best practice is to create a dedicated local user group or user account on the target computer specifically for remote connections.
Well, the best practice bit has been done in step 2, but now the fact that the local user will be treated as a non-administrator when connecting remotely stops WMI in its tracks, so:
- Run the registry editor
- Navigate to HKLM\SOFTWARE\Microsoft\Windows\CurrentVersion\Policies\system
- Create a new DWORD (32-bit) called LocalAccountTokenFilterPolicy, if it doesn't already exist
- Set its value to 1
Step 4 - Grant the user rights to the root/cimv2 WMI namespace
This consists of running a PowerShell script that's sat in the comments on an issue in the Opserver GitHub repository. I've copied the script here, slightly tweaked so that it can be run locally on the target machine. For a non-domain joined machin (which this isn't) leave $domain blank and set $username to the name of the user created in step 1:
$domain = ''
$username = 'YOUR_USERNAME_HERE'

$systemSecurity = Get-CimInstance -Namespace 'root/cimv2' -ClassName __SystemSecurity

$ntAccount = New-Object System.Security.Principal.NTAccount($domain, $username)
$trustee = New-CimInstance -Namespace root/cimv2 -ClassName Win32_Trustee -ClientOnly -Property @{
    Domain=$domain
    Name=$username
    SidString=$ntAccount.Translate([System.Security.Principal.SecurityIdentifier]).Value
}

$ace = New-CimInstance -Namespace root/cimv2 -ClassName Win32_Ace  -ClientOnly -Property @{
    AceType=[uint32]0 #Allow
    Trustee=$trustee
    AccessMask=[uint32]0x22 #MethodExecute & RemoteAccess
    AceFlags=[uint32]0
}

$sd = Invoke-CimMethod -InputObject $systemSecurity -MethodName GetSecurityDescriptor | select -ExpandProperty Descriptor
$newDacls = $sd.DACL |
    ? { $_.Trustee.Domain -ne $domain } |
    ? { $_.Trustee.Name -ne $username }

$sd.DACL = $newDacls + $ace

$systemSecurity = Get-CimInstance -Namespace $this.Path __systemsecurity
$retVal = Invoke-CimMethod -InputObject $systemSecurity -MethodName SetSecurityDescriptor -Arguments @{
    Descriptor = $sd
}

if ($retVal.ReturnValue -ne 0) {
    throw "SetSecurityDescriptor failed with $($retVal.ReturnValue)"
}
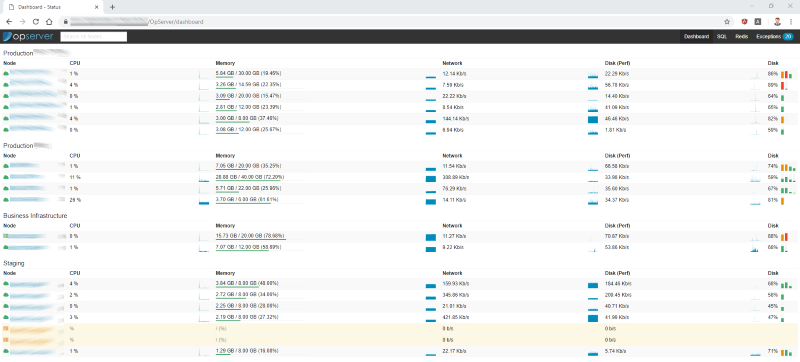
Once that's all done, adding the non domain-joined server to DashboardSettings.json should result in it popping up in the list of servers displayed with .WORKGROUP appended to the name:

If you need to test WMI connectivity at any point, you won't go far wrong looking at WMI Explorer.